
The FI9826P is identical to the FI9831P, the only relevant differences are the built-in 3x optical zoom and 2 additional IR LEDs.
The delivery is next to the actual camera and the wireless antenna a wall bracket with mounting equipment, a power supply unit, a LAN cable to a meter in length, a quick start guide in English and a software CD.
A micro SD card is not included, but can be retrofitted according to the manual low up to 32GB (although I think that 64GB should work, unfortunately I do not have such a card available).
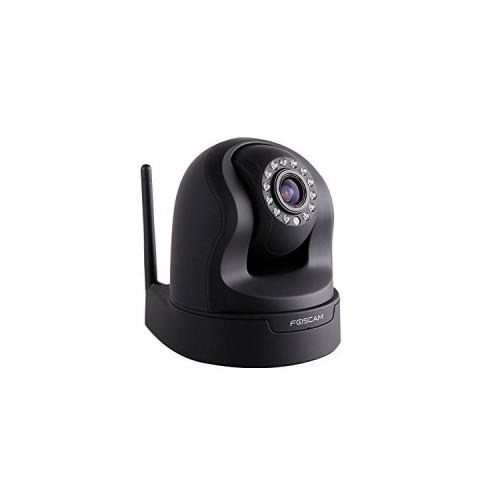
The camera itself makes a very high-quality impression.
The housing is made of a matte black plastic which acts very resistant.
Around the lens, the 13 IR LED's mounted on the night vision mode and the associated sensor.
In addition, there are down there on the housing and the integrated microphone on the back of the built-in speakers.
On the back of the power and network connection and the associated LED's can be found.
Likewise, a microSD card slot, the WPS button, audio input and output and the connector for the wireless antenna.
On the underside of the connection for the wall mount and a reset button is available (for more than 5 seconds).
The basic start-up turned out to be straightforward for a slightly more experienced users.
Beginners might perhaps be a little overwhelmed with the matter at the beginning, but since several quite complex network subject areas must be observed.
I recommend directly the complete (unfortunately only English) to use manual of the Foscam homepage since the Quick Start Guide is nevertheless very brief. On the Internet, I could at least find them also in German.
Basically, proceed as follows.
Connect the camera to a LAN cable and the AC adapter and supply power.
After that starts the camera and you can either start the search tool IP Camera search tool from the CD or from the Foscam website and find the camera or equal in your own router look (AVM example in the table in the point or under the menu item Home Network / Network) which IP address has been assigned the network camera.
Clicking the Search tool on the found entry or the entry of contracts awarded by the router IP address plus Port (with me 88) in the browser (IE, Firefox, Chrome) then you get to the browser interface of the camera.
The User Interface (WebUI = WebUserInterface) has at the top of three menu items for accessing the live video, the configuration and the media player.
On the left side of the web interface suitable additional menus are indeed at the option of the main function appears above.
Thus, for example, when live video launching the camera movement, called presets or adjust the video display.
In the configuration, there is a setup wizard, menu items for status information of the camera, basic settings, network, video, alarm, recording, PTZ (Pan / Tilt (Zoom), firewall and system settings such as the firmware update.
Here, users will find so very extensive options to configure his camera and to control, schedule recordings and alarms and set network settings such as UPnP, DDNS, FTP, SMTP, P2P.
The good structure lets beginners in the subject can quickly einzufinden in the matter.
Particularly noticed me are the following:
The (optional) Wireless LAN setup works according to instructions appear only after one has connected via a network cable with the camera, otherwise you indeed can not access the WLAN configuration.
I could but by the benefits of the WPS function of my router (if it supports it as my Fritz Box) also produce without cable connection directly with wireless-Connect. This should be better represented in the Quick Start Guide.
This is offered free of Foscam an own DynDNS service I find remarkable.
Although I could also use the built-in my AVM Fritz box but not everyone has this option.
Thus one comes also from the "remote" Internet on the camera.
The topic is not trivial, because it enabled some services and ports must be enabled in the router.
With the integrated microphone and the speaker built the camera can be directly used as intercom or baby monitor. Super!
The alarm function is solved well, because I could very quickly define the desired alarm areas and the required follow-up actions. For example, can automatically be sent with the alarm mail, made photos and videos on the microSD card, or an FTP server and an alarm will be issued.
There may also be a general recording schedule to be created.
This is very useful to eg take every night or only on weekends.
It can even single hour zones are defined, which I think is very positive.
A smartphone access with the app Foscam Viewer (available for free for iOS and Android) worked after entering the required data immediately.
Also joining via the QR code scanning on the camera's bottom side has to work perfectly.
The optical zoom is a highlight of this camera. It makes perfect sense in the monitoring, which it allows to control the range to be monitored much more precisely and analyze. Precisely because not digitally polished but working with the optics, the image remains absolutely clear even when Ranzoomen.
The selling of mine Android app Tiny Cam Monitor Pro has recognized the camera easily.
My Synology NAS DS-214play support this camera with Surveillance Station. This allows you to perfectly place the shots right there and control the camera also. This works great!
The Software IP Camera Client 1.4.14 of Foscam makes a very good impression.
It makes it possible on the PC / MAC as described above, the camera to use. The range of functions compared to the browser interface is nearly identical, you can integrate even more cameras, thus creating a multi-view, however here.
A firmware update via the web interface I could also perform with no problems. This 2 upgrade files are required (Step1 and Step2). The procedure is well explained in the accompanying readme.txt.
All in all I was very satisfied with this camera.
It offers a top quality and an extraordinary wide range of features for a reasonable price.
Even the support of third-party software or Apps and NAS vendors such as QNAP and Synology is not self-evident.
However, the manual should be provided by Foscam completely in German, so that the user can work more smoothly with the camera.
A micro SD card of at least 4GB should be included in my opinion also included.
I hope this review could assist you in your decision to buy .....


![[New P2P Technology] Foscam FI9826WP HD IP Camera WiFi WLAN for indoor use (3x zoom, 1.3 Megapixel, surveillance camera with night vision 13 LEDs, P / T Motion Detection Network Camera) White (Electronics)](https://img.tgreer.com/thumb/85x85/d/2b/d2bbff88359c5d3c.jpg)


