
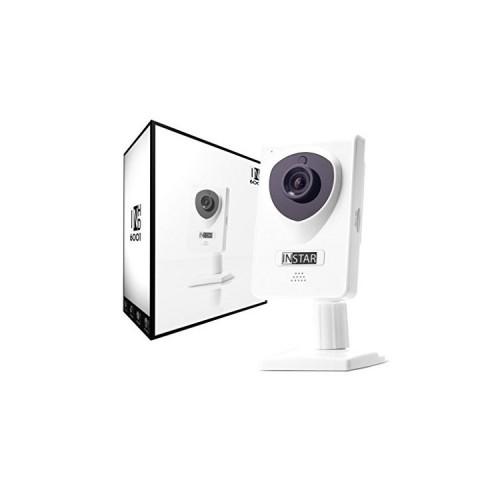
I want / like to describe to you here my experience with the IP camera instar IN-6001HD.
The delivery is next to the actual camera a stand which can be used with the included mounting hardware also available as wall / ceiling mount, an AC adapter, a LAN cable, a detailed manual and a software CD.
The WLAN antenna is integrated in the housing and not visible.
In addition, a 4GB card Micro SD card is inserted in the camera already.
The slot for is located right on the side.
This can, if required simply by another SDHC card up to 32GB, probably be replaced even with 64GB capacity (unfortunately I could not test this lack of a 64GB card).
The camera itself makes a relatively orderly processed impression.
The case is in my model of white, slightly matte plastic.
The Ethernet LAN port and the power connector located on the rear panel.
A connector for an alarm system is not available.
Installed is a 90 degree wide angle lens which made me very happy, one saves yet the additional costs for a later purchase.
On lens for night vision mode and the top center can be seen when darkness clearly the 8 IR LED's the twilight sensor.
The camera is practically rotated in any direction.
The built-in microphone and speaker, the camera can be used very well as intercom and baby monitor.
The operation is determined by three blue LEDs on the back indicates the (WLAN / LAN / Power)
Commissioning of the IN-6001HD is very intuitive.
It is simply connected to the AC adapter and the LAN cable.
Then it starts and you can look for a good minute, either the search tool instar Camera Tool to install from the CD and find the camera there or equal to the own router look which IP address the camera has been assigned. For example, AVM in the overview under the item Network or under the menu item Home Network / Network.
For me it is there characteristically ipcamera :-)
By clicking the Instar tool to the matched entry or the entry of contracts awarded by the router IP address in the browser (IE, Firefox, Chrome) then you get to the user interface of the camera.
With the Fritz box it is enough even just the link under "Overview / Network" button.
To see the live video on the Internet Explorer has the first call just an ActiveX plugin installed / enabled.
For other browsers the somewhat more complicated installation of Quicktime Player is necessary once.
Both are in the manual but very well described and easy to perform.
The User Interface (WebUI = WebUserInterface) has at the top of menu items for accessing the SD card, a quick screen snapshot on the same, a link to the online help (very good and detailed) and the option between the H264 and MJPEG codec to choose.
In addition, you can there by shortcut activate / deactivate the four defined alarm ranges.
In Internet Explorer menus are more astonishingly, is displayed, namely recording and player.
This also applies to the on-screen zoom and audio controls in the Live video that appear only in IE.
Why this is not the case with the Firefox, I can not understand for the life.
On the left side of the web interface is divided into seven different menu items with a variety of configuration options:
- Live video: You can here or off
- Software: Language Preference / Restart reset / backup (useful for multiple cameras) to upgrade the firmware and option
- Network: IP Configuration / WLAN / DDNS / P2P / UPNP
- System: Information on the camera / Date-Time / User Management / IR on-off / ONVIF configuration and a system log
- Multimedia: Audio / Video / Image Settings
- Alarm: areas / actions / timetable / SMTP / Email / FTP / Audio alarm / SD card
- Recording: Schedule / video / photo series
I find the structure of the menus very well done!
It offers a huge variety of information and configuration options, which are but the logical structure to understand even for a normal user or a beginner for a short time.
I would like to highlight the following points:
The immediately conducted by me and firmware update WebUI worked perfectly. Please afterwards but still the chronicle my browser so that it does not become a strange behavior of the web interface comes (such as duplicate menu items, non-functioning buttons, etc.).
To connect the camera via WiFi, you should click after the successful connection to the Kabelnetzerk / LAN directly to the menu Network / WLAN, activate this, select from the search results and select the WLAN and then enter the associated password. After pulling off the LAN cable and the power plug and then the latter directly again. Then the camera reboots and joins now with the WLAN.
In wireless, I could notice a significant delay of the live video, despite near-perfect connection.
Movements came only with 7-8 seconds delay in the live video.
Also in the LAN the camera responds when Firefox not immediately but approximately 4-5 seconds later, what has me also very surprised.
In IE, the live video is worth against his name. Strange!
I'm going to contact the manufacturer and represent the result here.
To call the camera comfortable with the browsers (eg, via a bookmark), or when using the smartphone apps or the remote access from the Internet is recommended to set up a static IP address under Network / IP configuration. There simply disable the DHCP server and take over the existing values with "Confirm".
Then the camera always retains the same IP address.
This is even offered free of Instar an own DynDNS service I find great.
Although I could also use the my AVM Fritz box but not everyone has this option.
In order for a port forwarding allows access from the Internet to the camera.
The also integrated P2P and UPNP services I have never used to have the option, however, is very useful.
The ONVIF (Open Network Video Interface Forum) compatibility ensures a future-proofing of the camera and the usability of the many available on the market free / purchase software tools.
By using the built-in speaker and microphone, you can build a simple intercom with the PC or Smartphone. This works as describe but apparently only with the Internet Explorer, the Firefox missing the menu items in the live video right below completely. Why this ??
The alarm function can I find simply outstanding. In a very short time the alarm ranges and the desired sequence actions are defined and a timetable.
This function can in each case an alarm automatically mails with pictures of the "crime scene" to be sent to a defined mailbox.
Even describing the SD card with videos / photos to a motion alarm worked great.
It is also possible to send the files generated when the alarm on an FTP server.
I will still try my new Synology NAS.
A very useful and very interesting for me feature.
My Synology NAS has recognized his Surveillance Station the camera, as I have this configured as ONVIF default device.
This extends the field of application even further.
Recording of series of photographs or videos by schedule: Also easily set up and very useful to eg every night or at the weekend to take days just controlled with short absences. However, the option is missing to me also enter hours / minutes or areas to define a period as two weeks for the holidays.
The smartphone access via in-house app "Instar Vision" has to input the necessary data to work immediately and makes a real head turner. The third-party app Tiny Cam Monitor has recognized the camera, and thus work fine.
At the lens you can change the depth of field by turning and adapt to their needs.
My conclusion to the IN-6001HD falls overall very positive.
Only the delay in WLAN mode and the LAN operating additionally with Firefox and the functional deficits in the use of the my favorite Firefox I did not like.
Perhaps instar can verrringern by a firmware update the wireless delay and enhance the support Firefox something?
I'm trying to clarify this with the instar Support.
I hope this review could assist you in your buying decision ...


![[New P2P Technology] Foscam FI9831P HD IP Camera WiFi WLAN two-way audio with built-in plug and play microphone, motion detection, email alarm, free DDNS, SD card support, (1.3 megapixel, wireless, 1280 x 960 pixels) Black (Electronics)](https://img.tgreer.com/thumb/85x85/d/e9/de94b3c527837dcd.jpg)


![Colin McRae: DiRT [Bestsellers] (computer game)](https://img.tgreer.com/thumb/85x85/9/d5/9d525af3ba22547907880556f0a99b88.jpg)
