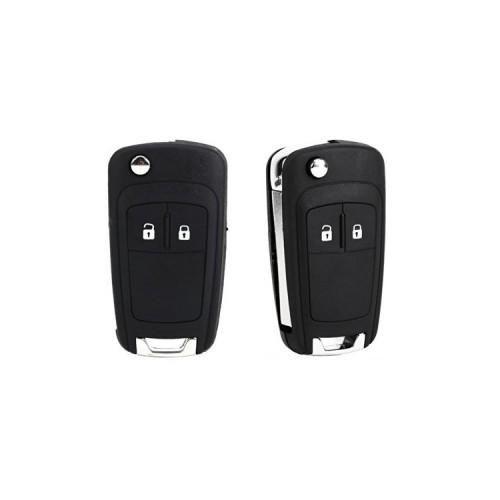
The good news first: The housing fits perfectly for my key from Insignia Bj.12 / of 2010. I had, as well many others, the misfortune that after about four years, the die-cast part has broken down in the the key bit inserted. If the wall thickness at the fracture site you look at, it's no wonder. On the Internet, I then determined that a spare key in Opel as the 130 (in words: einhundertudreißig euros) will cost. The (inexpensive) solution to my problem was greed then this key housing. The exact solution is that incorporating the key bit, the electronic board of the old key into a new case. Here we go: 1. Open the replacement enclosure. Battery lid lift (like the original) and unscrew the locking screw at the rear of the chassis. The housing can be opened with little force now. TIP: Remember good at disassembling or photograph, as the folding mechanism was installed! 1. Remove the beard of replacement housing be removed by the cotter pin that secures the beard from falling out is removed. Somewhat problematic was the knocking out of the cotter, which I succeeded only after I back (in my case was quite smooth and shiny, not the page on which you could see the splint) was drilled slightly. For knocking out I have in the absence of a suitable pin punch a 1.5mm bit used (shaft toward sapwood and then sooooo carefully tap with a small hammer to the drill bit). 2. Remove the old beard against the replacement housing exchange (nice attention to the direction) and back up again with the cotter pin. 3. Open the old key housing. Now it's getting worse! With me the case was not locked and secured with a screw as the replacement housing, but glued. As helped only a few cleverly placed round cuts with a Pucksäge. Caution, so that the electronics will not be damaged! 4. electronic board and the contact spring of the battery in the replacement housing mount. The parts fit perfectly with me. 5. Install the folding mechanism. Since we have indeed noticed how the parts have to sit, it's easy :-). In order for the key but as usual pops nicely again it must be biased. For this, the top of the housing needs (the one with the buttons) before finally snapping even one full turn counterclockwise (already formed spring) are rotated while holding the housing parts nicely under tension. One must also note still that both spring ends are securely latched. You have to maybe practice a little, but you can not break anything really. BUT !! The contact spring for the battery in the maneuvers do not bend! 6. housing push, use the securing screw again, battery 'pure, battery compartment lid on it, ready and' saved a lot of money.
... And why there's only 4 stars? Because the adhesive Logo for covering the locking screw is not present. Come on, I've known, so it 5 stars!


![BioShock: Infinite (uncut) - [PC] (computer game)](https://img.tgreer.com/thumb/85x85/0/23/0237ad56f638d27f.jpg)


![[USB 3.0 | SATA 6Gb | Offline clone function] Inateck FD2002 2-Bay USB 3.0 HDD Docking Station with Offline clone function for 2.5-inch and 3.5-inch SATA 6G hard drives (SATA I / II / III) Support 2 x 6TB Komaptibel with Windows XP / Vista / 7/8 | Linux | Mac OS (Electronics)](https://img.tgreer.com/thumb/85x85/6/69/6690504f9ab4d71d.jpg)


