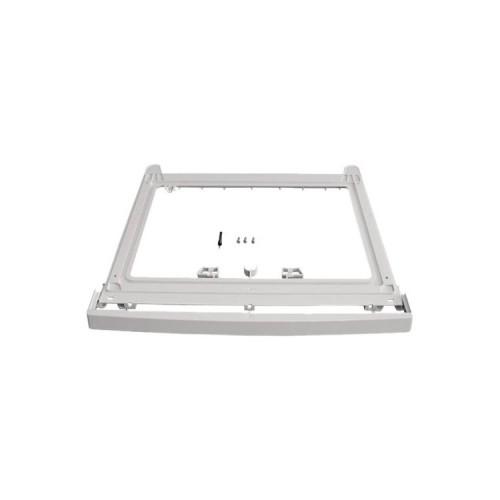
Functionality:
A frame with 4 guide rails for the dryer feet is screwed onto the cover plate of the washing machine. These 4 holes are drilled for the frame, which is very simple, because the frame can be used as a template and the drill is to fix them. The drill has a depth stop so that there is no fear must arise due to drilling in the washing machine.
Tool:
The frame is easy to install, satisfy a drill and a Phillips screwdriver.
Installation additions to the supplied manual:
- Please click in Einklickbare aperture when adjusting the frame to mark the frame and take forward flush and laterally symmetrical distances can (left = right). It does not get irritated: panel has 2 tabs that lead down. As long as the frame is not bolted, the impression may arise that all this does not fit properly. Once the frame is screwed, the dryer on the WaMa, the Verrriegelungs clips are clicked, the lugs serve to clamp the diaphragm, so that it does not wobble.
- Adjust the length of the feet of the dryer: there is a white spacer of 17 mm, which serves as a measure of how far the dryer feet are pulled. Depending on the dryer's feet are but 18 mm "wobbly". The feet must not be so far removed.
Set Top previously as follows (at the same time the principle of operation can be made clear): Take out the water tank of the dryer, set the dryer on "back" in a box (may still some water leak). Legs supplied 17 mm or scale with cm-level gleichmäßg unscrew and slide the frame to try (in this Test will halt the frame moves, after installing it, the dryer).
- Screwing the frame: Aperture previously click the frame.
- Screwing, dryer feet introduce (for two!), Lock with Arretierungsclips front panel and click it.