The operation is done in several steps:
Remove the screws on the connector
Pull the screen with a suction cup (here, for this operation, you need to find one! The suction cup with a cloth hangs do)
Remove the metal shield covering the tablecloths
3 Disconnect the cables tablecloths
Recover damaged elements of the screen (screen protector shield assembly and headphones)
Collect the front camera and proximity sensor
Get the Home button
Put these items on the new screen identical
Reinstall the screen thus assembled and put the screws
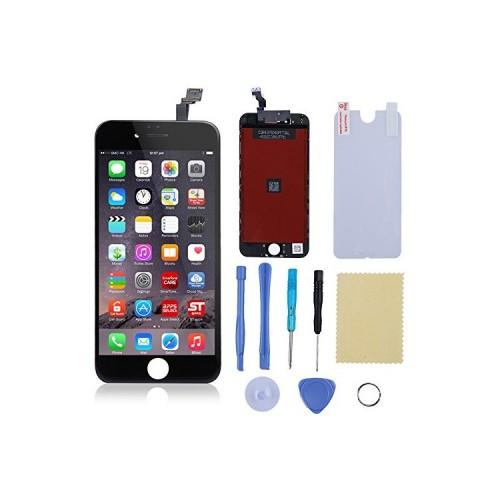
The screen of your iPhone is broken and you prefer not relieve you of a hundred euros to repair it? We understand you. The most economical solution is to repair your Apple smartphone on your own. This requires, however, the right tools and adequate spare parts (and realize that tinkered iPhone is out of warranty Apple).
The simplest is to purchase a complete kit with all the accessories. Prices vary greatly, from 35 to 100 euros. However, watch too tempting prices, the quality of the supplied screen may suffer: dead pixels or areas where the touch is not working can be in the game. Do not be too stingy on the price to put in this kit.
Having the right tools, an essential prerequisite
If you already have a replacement screen, it will aquire the following tools: a suction cup, a spudger (to facilitate the placement of cables), tweezers, plastic opening tools and the screwdriver suitable for the Opening of the iPhone. A model for some pentalobe 4, 4S, 5, and 5c 5s.
Before you start, the safer is cramming the many tutorials photos or videos that exist on the Internet. Nothing better than seeing someone else do before jumping into the unknown. Among the successful tutorials in French, including those listed site Sosav.fr, photos and very detailed. You can even find a complement to the site the parts needed for this type of repair.
Then you have to play still in mind a few tips:
First make everything very careful not to lose the screws that you remove. To do this, grab an empty egg carton and put the screw in each cell and numbered in the order of disassembly.
Proceed with care and patience. Once removed the screen, the connection webs are still connected to it, be careful if you do not want to tear everything to the first movement.
Be careful when refitting, avoid excessive force on parts. If they do not seat easily, you may have made an investment mistake.
If your screen encounter malfunctions once ascended, do not panic, it may simply not a connection is properly reconnected. In this case, repeat manipulation paying attention to this detail.
If you proceed methodically and carefully, everything should be fine. The best? Get help from a friend a little bit handyman who can give you good advice or even perform some delicate steps for you. Unity is strength, right?
Proceed by steps:
Step 1: Before you change the screen of your iPhone 5, it is necessary for safety reasons to turn it off.
To do this, hold the On / Off button (power button) located in the top of the phone for 6 seconds.
Then, slide your finger to the right on the button "Turn Off" appears in red.
Step 2: Remove the two screws circled in red on the photo-cons with a pentalobe screwdriver.
They are located under the edge of the phone around the charging connector (lightning).
Step 3: Place a suction cup on the glass of your iPhone 5.
The suction cup should be positioned closest to the home phone button (round button at the bottom of the iPhone 5).
For better grip of the suction cup, the latter should be positioned on the whole glass.
For a better user experience, we recommend using the suction cup.
Step 4: Make sure the suction cup firmly maintains the screen of your iPhone 5.
Pull the suction cup toward you with enough force (constant) to create a space between the display assembly and the rest of the iPhone.
Then gently insert into the space created by the separation of the screen, a nylon spatula in order to pry.
The screen of the iPhone 5 is still held to the frame by retaining clips. To unclip the display assembly, slide the nylon spatula on the left side, then on the right side.
Step 5: When does the detached clips, lift the screen and hold it upright as pictured.
Caution: Do not attempt to remove the screen at that moment! The latter is still attached to the rest of the iPhone 5 by multiple connectors.
Step 6: Remove the three screws securing the terminal cover to the motherboard of the iPhone 5:
2 Phillips screws 1.2mm circled in red,
1 Phillips screw of 1.6 mm surrounded in yellow.
WARNING: This last screw is not magnetic, so it will not stay attached to a magnetic screwdriver. Be careful not to lose it during disassembly.
Step 7: Using a clamp, then remove the connector cover of the screen and rear camera.
Step 8: Use a nylon spatula, carefully prying to disconnect the connector linked to the entire front camera and proximity sensor.
Step 9: Still using a nylon spatula, then disconnect the connector connected to the touchscreen.
Step 10: Disconnect then (again using the nylon spatula) connector of the LCD screen.
Step 11: You can now remove the screen of your iPhone 5.
Step 12: Remove the two screws securing the cover / support the internal speaker:
A 4.1 mm Phillips screw circled in red,
A 2.2 mm Phillips screw circled in yellow.
Step 13: With the nylon spatula to gently lever to slightly raise the cover / internal speaker support.
Then with the pliers, enter and remove your iPhone 5 support.
Step 14: Keep the clamp to grasp and remove now listening speaker (internal speaker) of the iPhone 5.
Step 15: Take off gently with a spatula made of nylon, the camera assembly before + proximity sensor.
TIP: For convenience, first switches in the internal speaker.
Step 16: With the clamp, then remove gently enter the slick front camera + proximity sensor.
Step 17: Remove the two Phillips screws circled in red.
These screws hold the home button and its support to the glass of your iPhone 5.
Step 18: With the nylon spatula, gently peel off the entire web from the home button + support of the touch glass.
Note: For convenience, we suggest that you take off all starting from the left.
Once peeled off the left side, use the tip of the spatula to gently loosen the portion of the web glued to the touch glass.
Once off, you can completely remove the entire sheet + support of the tactile home button of the iPhone 5 glass.
Step 19: Use the tip of a nylon spatula to gently loosen a corner of the home button on the touch glass.
Once off the corner, use pliers to completely remove the home button of the touch glass.
Step 20: Then unscrew the two screws securing the cover plate of the LCD:
A Phillips screw 2.6mm surrounded in yellow,
A 1.4mm Phillips screw circled in red.
Step 21: Using a Phillips screwdriver, unscrew the two screws found on each side of the LCD screen (so 4 in total).
Step 22: Make now gently lever to remove the cover plate of the LCD screen.
Step 23: The LCD screen of your iPhone 5 is now fully disassembled.
You can replace it with a new one if necessary. Reverse the procedure for reassembly.
On the site of chronic Goliath: (leschroniquesdegoliath.com/produits-hi-tech-testes-pour-vous/changer-un-ecran-lcd) you will find this entire article with corresponding images and videos.