If the luminous spotlight is not active, press several times on the "Laser / back light" button (yellow, top, right, triangle and bulb) in order to validate / invalidate the display of the icons of "Spotlight visible laser" and " back light "selon wanted the choice.
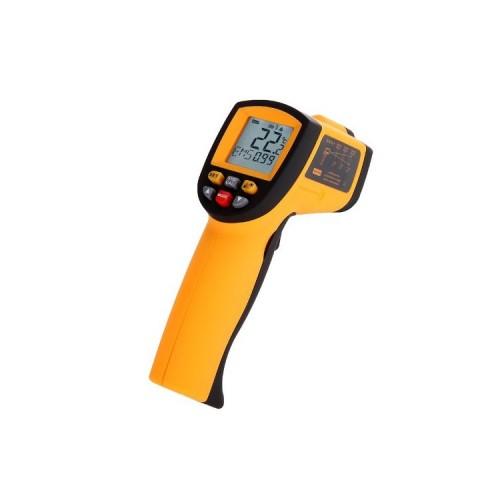
LCD and buttons
Figure 1: LCD Display
A: measurement scanning
B: measurement unit
C: visible laser spot on or not
D: backlight on or off
E: The battery charge level
F: being able to scan or not
G: HOLD: data sampled by the measurement previously performed
H: Fashion / indicator emissivity (EMS)
I: data storage / read icon
J: low temperature alarm
K: high temperature alarm
Figure 2: Schematic description; Buttons with various parties
Trigger
At power up, displays the version of the display type software "VERXX" for 1 sec (faux, nothing like).
Then turns display for reading with SCAN icon.
Upon release of the trigger, then displays the result with the SCAN icon.
Automatic shutdown after 30 seconds.
Button "Laser / Backlight" (yellow, top, right: triangle and bulb)
Press several times to enable / disable the display of icons of "Spotlight visible laser" and "Backlight" in the desired choice.
If the backlight is active, all operations will remain backlit for 10 seconds.
Buttons 3, 4, 5, 6
Repeatedly press the 3 button (MODE), the display of the following parameters will flash:
MAX; MIN; DIF; AVG; HAL; LAL; STO; EMS
Press 4 (SET) to store this mode, so to make this special treatment
The chosen setting will be stored, so that at the next power up, the device is placed in this mode.
Validate "EMS" to get the normal measurement mode.
Description of the various operating modes:
EMS
Standard configuration of the temperature measurement.
Press 5 (Triangle amount increment) or 6 key (descending Triangle, decrement) to adjust the value of the emissivity factor, which is 0.95 in general; press 4 (SET) to save the value and return to the normal state.
MAX
Measure the maximum observed temperature for the temperature reading by maintaining the activated trigger.
MIN
Measure the minimum temperature observed during temperature taking now activated trigger.
DIF
Calculate the difference of the current playback.
Start by pointing to an area in order to acquire the temperature value serving repository, then store this value by pressing 4 (SET), then sweep other areas, which only displays the temperature difference.
AVG
Measure the temperature observed during temperature taking now activated trigger.
HAL
High temperature alarm.
Press as many times as necessary on the 5 (Triangle amount increment) or 6 key (descending Triangle, decrement) to adjust the value of the high trigger temperature alarm; confirm by pressing the 4 key (SET).
Upon detection of a high temperature, the "HI" icon is displayed and an alarm signal "BiBi" will be generated.
LAL
Low temperature alarm.
Press as many times as necessary on the 5 (Triangle amount increment) or 6 key (descending Triangle, decrement) to set the low temperature alarm trigger value; confirm by pressing the 4 key (SET).
Upon detection of a low temperature, the "LOW" icon will appear and a warning signal "BiBi" will be generated.
STO
Storing data.
Take a measurement, and then press 6 (STO / CALL), while "01" is displayed, indicating the first memory address; press 6 (STO / CALL) for storing; then the memory address increments and repeat if necessary to memorize by pressing key 6 (STO / CALL) etc.
To recall stored data, get in normal measurement mode (EMS), press 6 (STO / CALL) for reading the first stored value; again press button 6 (STO / CALL) to read as follows etc; be quick otherwise the display returns to standard mode (EMS).
To delete all stored data, get in normal measurement mode (EMS), press 6 (STO / CALL) at least 3 seconds.
Switch Celsius / Fahrenheit
Open the unit and push the slide switch to select the temperature display type.