Delivered: The disc here
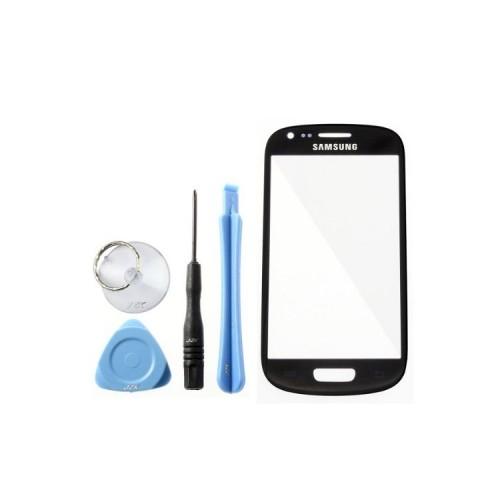
Some of useless tool. example
2 screwdriver (no bolt that need to be resolved)
Plastic hooks (not stable enough for the delicate "operation")
Sucker (usually not useful to replace, unless the disc as a whole is already half-free.)
Plectrum (Virtually, prevented when pushing the back flap of the old disc.)
and
Pressed doppelseitge tape strips for the fixation of the new disc
What is still needed:
A blunt kitchen knife
a hairdryer
a third hand (for the hair dryer)
Procedure:
Yes I know there are many videos to. But so much is there either wrong or not at all mentioned.
The digitizer under the glass and the top broken glass pane are in the model also glued together, so the disc is not just at the edge of the border. The point is, the larger the surface is unbroken, the sooner you get the glass as a whole, the digitizer solved. The more fragments produced her to have the more work it before you.
So because ...
1. Warm make the old disc with a hair dryer
2. make more hot !!!! Yes ... a lot more than in each of the videos that I have seen!
If the finger that is sizzling hold the phone it correctly (90 ° C) (one can wear cloth gloves)
3. Carefully dip the knife on top of the phone in the crevice between the frame and glass (If you start below can also throw her the S3 Mini directly.)
4. faaaaaar slowly build up some pressure by lever. (You will then see already when something is happening under the glass. The adhesive needs time to let go in order.)
And here is very important, blow-drying + hold + very little pressure. Eventually, the color begins to change under the old glass. Then you can observe how the bond continues dissolves very slowly. The higher the temperature of the glass more easily, the glue dissolves.
5. As soon as the pick fits underneath, insert
6. Upper side completely open (fan + pry + Knife + plectrum)
7. If the knife edge across the entire width of the phone goes in, you've already won, if parts break you have against a lot of work ahead of you.
When that happens, you have to blow dry and the top of the knife from the side of the remaining glass edges go Ran and lift (do not pry against the lower disc!). Does it "knack" you have lost.
With the hair dryer but you can help a lot and the disc Splitter can stand out with little resistance.
8. With the knife SLOWLY (much patience here is the key to success) Carefully lift under constant blow dry piece by piece the disc. We see this fair as the adhesive gives way under the disc.
9. Below arrived, the old disk is not easy tear, but with the knife only solve the contacts for right, center and left button of the old glass and managed .....
Now when cleaning the digitizer happen like even a few annoying things that no video mentioned.
- Man rubbing with a cloth and glass cleaner away the remains of glue and tiny pieces of glass in the adhesive and the edge come under the cloth. Unnecessary scratches in the digitizer are then inevitable.
- Tiny shards of glass remain unnoticed at the edge in the corners and in the adhesive residue, then come under the new disc. When pressing the new disc it makes then immediately "click".
If these tips are already too complicated - Stay away from surgery.
Who has done it up to this point:
The accompanying double-sided adhesive strips only with a sharp knife tip rid of the cut-outs. Since adhesive may not even cover remain.
Then, the film with the punched göffneten stick to the new glass, then gently put this press gently on the phone, brushing, rubbing smooth.
What remains:
After the successful repair you have unfortunately sometimes expect that the mobile phone can no longer be operated so smoothly. In some keystrokes (especially in the corners) it reacts only with more finger pressure than before. But it works again and looks like new.
... I hope my scribblings will help you a little.