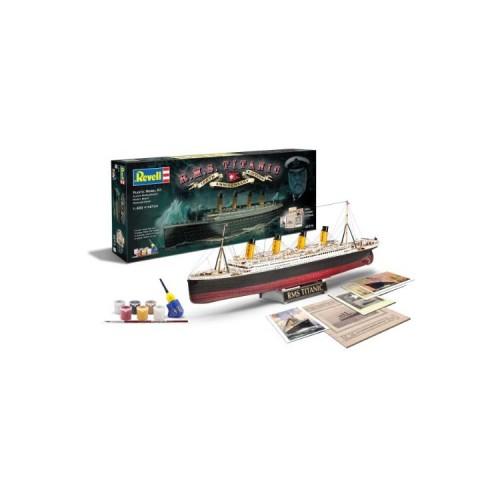
Model and side dishes
The model itself seems to be from 1998 (a small copyright notice in the hull suggests), nor corresponds to this state. So no filigree plastic but zuuu thick. The parts are reasonably fit, that one with a craft knife here and there a few Remove burrs should I find in this type kit normal.Insgesamt but everything was great.
The accompanying colors and glue are a joke. First, the enclosed colors would never be enough to even come close to covering the model. Secondly, I would like to see how daubs a 60cm ship with a small brush. The small glue bottle lasts maybe just for the hull and Something. I think Revell tried here to encourage people to the colors to be used as samples to order then by Revell.
The postcards and booklets are ok but who hochwertoge here replicas of the original menu is expected disappointed that has rather something better photocopy level.
And then build
Given the meager offerings color and because I had no desire auszumotten my airbrush I have for Tamiya spray decided (there's Amazon, Conrad, Ebay). The best match in my opinion:
Tamiya TS-6 Matt Black (Hull, chimneys), 1 tin
Tamiya TS-14, Black gloss (for the stand, because in Matt shine otherwise the edges of the Titanic Decal lettering)
Tamiya TS-27, Weiss Matt (hull, superstructure), 2 doses - more to the amount later
Tamiya TS-33, hull Red Matt (hull bottom), 1 tin
Tamiya TS-34 Camel Yellow, (chimney), 1 can (here you could also take brush color)
Tamiya TS-68, Holzedeck Brown, (decks) 1 tin, tint fits about
Tamiya XF-72, Brush Color Brown Matt (banks) - because you can finally use also the little Revellpinsel :-)
2 large bottles Revellkleber with cannula (sort of like the small with the model supplied)
Color charts to compare the colors can be Googling. From brushes I would advise against because you should manage such a large hull surfaces with the brush hardly streaks.
First you have the hull are glued. This consists of two halves and it is the only elemtar important and absolutely critical component, because you are not working properly when here one has an ugly column below and above it will no longer fit. I would not be frugal here with the adhesive, possibly small Auslaufer disappear under the paint. Adhesive tape and two clothespins (for bow and stern) the bonded fuselage fix really 24 hours, and also make sure that the cross supports in properly in the holes in them are as far as possible and that it is also behind the overhang any column has at the rear. The fuselage sections are actually very fit, but it's just a long glue line.
I even inside "secured" in connection still the next day with 2-component adhesive.
Next, the hull must be painted. Before looking that no remnants of tape, fingerprints and dirt are on it, they wash if necessary. The plastic is not available in BLACK. I understand that you probably wanted to help so that modelers who want to paint anything but white color on black plastic .... a lot of fun. That is best done without masking by white the Top margin ansprüht. Here, many (and I mean a lot) Spray thin layers, so that it eventually actually covers, but the details are still visible. Tamiya paint is very high quality and covers this also not really, unless you're hammering the same the whole can it. Also Triefnasen dressed often even straight.
Now the hull bottom paint analogous to the Red, where we know that needs to protect so you do not draufkleckert. When everything is dry, the white and red hull Half Mask (masking tape) and then first very fine black spray in the middle (not make it under the tape creeping). Then another layer and that's it. And one more thing: When taping the hull a "welding" looking seam and glue along, on the seam so that the black color is not running under the tape. The tape really press well. Now, if the transition from black to white is not quite succeeded, you can save it by black stripe decal concerned (eg Microscale) and this applies to the cutting edge. There are in the United States "Micro Sol" a decal aufweicher who puts this to the contours. But only as an "emergency measure" if it went wrong.
Next, build the stand, painting the ship and stick it. Here, be careful because you do not want to mess with glue the fuselage.
The rest is actually quite easy, because steamships not have sooo many details. I would paint the parts first and then cutting loose and grow from the sprue, possibly the splices then touch up with paint (spray paint shot record on a piece of aluminum foil and with a brush).
Revell sets the 70s "ship rigging twine" for the antennas to. If you like, a role can the USA (Ebay) "EZ Wire" order, is not expensive. This is a Masstabsgetreues elastic rubber band, which is unbreakable and can be fixed with superglue. In fact, I've already managed to break telegraph poles on the layout because I'm stuck on the rubber band, which is the telegraph line.
Last but not least a few safety tips: use spray paint and glue only in well-ventilated areas. The hardware store to buy a breathing mask (one-way flow Dinger rich, but it is suitable for painting) because ink particles in the lungs do not feel good. And wearing glasses put the glasses on the best far away, even when recovering first check the finger, otherwise you have a colorful spectacle.
Overall, it has become a beautiful Titanic. If one takes the time to dry things well and does not want to finish building overnight all, it looks really good.
And for the price, I find the model also fine. However, you have to stop a lot to expect for the colors. Even with use of Revell.