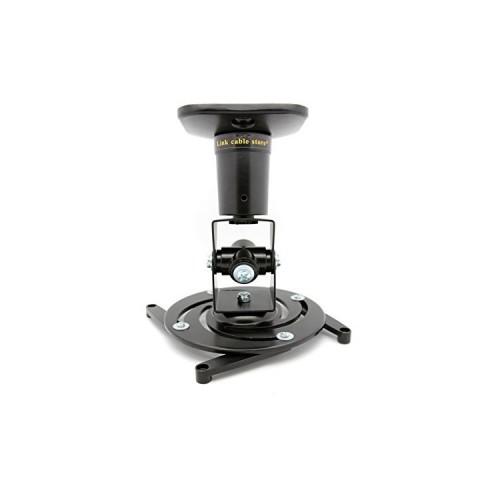
It is made of cast aluminum and sheet thickness, so it is solid but lacks rigidity plate: it is a bit embarrassing for setting and downright problematic if your wood ceiling is the floor of the stage, or you live along a road and the trucks vibrate your walls ...
It is bigger than the photo would suggest.
What we particularly like is:
- Fixing "hook" between the part fixed to the ceiling and attached to the deck projo: a fixed time each game, there is only to suspend projo and tighten 2 screws: easy and secure.
- Everything is removable which is significant to be able to fix the plate to the ceiling: we first fixed the square flat plate, and then you go up the rest, so nothing interferes with the tools to target ceiling
- Everything is adjustable with a high amplitude (the limit is related to the size of projo over foot length), so we may set foot ceiling no matter how it is always possible to align the projo degree closely.
- Hollow feet, and designed for the cables down from the ceiling
- The package is small enough to fit in the mailbox.
It comes as a kit, the English manual includes the necessary schemes for those who do not understand English.
Also remember to look at the pictures on the box AND NOT THE PHOTO FROM AMAZON where the gimbal system is not installed!
For non-yourselfer, installation is simple with a little method, here are some tips that are not in the record.
Projector on the mounting plate:
- There are many more screws than necessary, we must identify those that are useless (they are screwed or stand or on the projector), and you must bring a Phillips screwdriver (rather large ) and a key 10 to tube or sleeve (not wrench) if you keep the original screws.
- Given the lack of rigidity of the sheet, it is highly advisable to identify the projector center of gravity and place the support in this location to facilitate subsequently setting: to do this using an eraser and put the projo balancing above, it will be the ideal position for the foot. In general, the mounting holes are well positioned, but on the Panasonic it's everywhere below, so nothing shows where to place the foot as much as what is heavy in projo is the power supply and the lens (if in doubt, check the manufacturer's website projo, there is often optional support for your projector, which shows how it is positioned).
- If you know you'll have to tilt the projector forward, it can move back foot and vice versa.
- On when the octopus (spirals + 4 support arms as shown and do not forget the washers and loosely), put the projo upside down and arrange to arms are in front of the holes, the support opposite the center of gravity and all the screw heads accessible for final tightening. It also requires that both the adjustment cardan aligned with the projector axis
- Tighten the screws adapted (right diameter and not too long to avoid damage inside the projo) and remember to put a washer between the projo and arm. This is important because the tightening metal arm will punch the plastic of projo.
- Start by tightening the screws on the octopus, then the projo.
- Loosen the 2 screws that are coming cardan hook onto the ceiling bracket and see how it will all come up before attacking the ceiling: you'll see that screw the vertical tube so that the hook are positioned correctly for the toggle. I advise you to hold the foot in hand, all screws loose to see if the projector is well balanced.
Ceiling mount:
- First ensure that you are in the correct position (distance and alignment) and that nothing hinders the hot air outlet of projo.
- The alignment is very important because few projo have horizontal keystone adjustment. The projo must be in the median vertical plane of the screen (the screen and perpendicular to the middle).
- Distance: there is a mounting abacus projo in your doc, but the best is to take the test (test projo bar display with the zoom in middle position): the image has to cover the desired surface ( take the opportunity to select "ceiling mount" in the projector menu to invert the image, it will be useful for the end of the assembly)
- Fixing: it is unlikely that the fixing plugs supplied with the substrate suitable for your ceiling, especially if your projo is heavy. Drill 2 pilot holes 3mm a ceiling in order to know the nature and thickness of the ceiling. If you know nothing, go directly to your hardware store and ask for advice: according to these information (dust holes tell you if it's plasterboard, wood, brick, concrete, etc ...) and the mass of your projo, you will have what it takes, including the quality of concrete drill and the right diameter if necessary.
- Firmly fix the plate and only then assemble the rest of the support, temporarily tighten the screws for mounting. Pull the strongest medium weight projo to make sure it does not fall.
- Before suspending the projector, consider temporarily tighten the screws gimbal projo side (this will be much easier to hang the projo) and unscrew those hook side of the ceiling bracket. Suspend projo.
- The end of the assembly is trivial. Consider mounting the projo safety cable if you have one (it must secure the closer to the ceiling, ideally on a 3rd saw the ceiling if you're paranoid ...).
Setting:
- Connect the cables on projo first: given the lack of rigidity of the support, you will move the projo by connecting the cables, and it is possible that your cables alter the setting by pulling the projo.
- All screws must be pre-tightening (but not tight with minimal clearance): we must keep in mind that the tightening of a screw will inject efforts in support and thus risk disrupting the projo. If you've centered your foot against the center of gravity, the projector will remain in position even with non screws tightened.
- The first setting is Zoom: adjust the image to the screen size.
- 2nd adjustment = Alignment: not the top of the image must be parallel. Must be set by changing the orientation of the projector (vertical axis of the foot) and modifying the optical horizontal offset if your have this setting. If you do not have it, align the image on the screen and correct the horizontal keystone. If it does not exist, you must re-drill further holes in the ceiling ... Tighten the screws in small grove foot rotation when the setting is done.
- 3rd = horizontality adjustment: rotate the projo around the axis of the lens until the horizontal lines that are horizontal. Tighten the 2 screws from carding matching this joint.
- Last setting = image height. If you can change the offset optical, keep the projo perfectly perpendicular to the screen and change the offset (do not touch the keystone correction). If we only have the keystone correction, made nosedive your projector and align your horizontal edges to the desired height. Tighten the screws of the last gimbal, change the vertical keystone correction in your projo, and make fine adjustment of the focus (are promoting the subtitle area if you like the original version, otherwise the screen middle).
- Test film
Additional Notes for the purists of the image quality:
- The use of keystone correction deteriorates the image (resolution reduction / pixel interpolation + no sharp image on the screen), so it must be done to make the projector perfectly perpendicular to the image after fixation.
- The ideal position of the screen is facing in the eyes, not in height. But the support is relatively short, so if the ceiling is high we must consider adding a mat to get off the projector, or ask the projo on a shelf, table, etc ...
- Depending on the quality of the screen and paint the wall, you may have a hot item on the screen (reflection of the lamp projo). Keep this in mind when positioning the projo before attachment (be the night test).
Specific remarks PT-AE4000:
- The projector is big, and one of the attachment points is too far to the length of the arms of the octopus, but given that there are only 4 to 5 holes arms is inconsequential.
- The center of gravity is located 3cm on the right of the axis of the lens (projo upside down, front view) contrary to the holes suggest (they are on the right).
- Keystone correction is not necessary because the projo has an optical offset. But if we go on extreme, the image loses quality (color fringes). So fix the projo in the central plane of the screen is a great value.
Anyway, this is a great product for the price!