
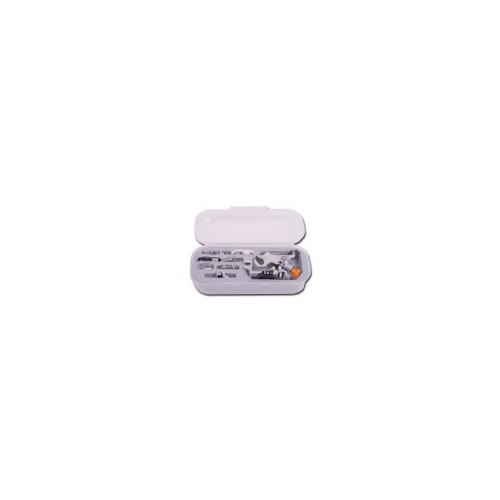
So I'll show you even know how the assembly with my Brother Innov-is 550 works.
The set number of feet and two Quicksnap adapter are included.
For the two adapters I have no use, since my machine already has the Quicksnap system. Therefore, I can grab it, the five flat feet as usual without unusual herumbauen on the machine.
A special feature of Ruffler is after I have now tested a great part. When I think how awkward I have placed far wrinkles
Unlike the little feet that does not fit into the snap system the original adapter must unscrewed from the rod and feet instead of Ruffler be mounted.
Before starting, one should check if the sewing bobbin thread on the bobbin is sufficient, since one does not come to the bobbin case with mounted Ruffler.
So I have the Faltenlegerfuß mounted: (see photos)
- The lateral screw that secures the adapter feet on the feet rod, carefully remove with a screwdriver. The adapter drops to the needle plate. On my machine it can not be pulled away from the side then, but rotate / tilt by careful you get him away. DO NOT FORCE, this is quite easy, you have to rotate the part just right.
- Set the folding mechanism on the needle plate and push / turn at the feet rod with the screw lock. The bracket right you have to hang about to make it work!
Before now with the middle straight stitch starts sewing necessarily cautious the first stitch on the handwheel to check that the needle moves freely through the narrow opening in the bottom of the foot and the needle plate. Zigzag / decorative stitches can not be used with this walk!
With the orange screw you can adjust the depth of wrinkles in my sample I measure now even 6-7 mm in a tightened screw and 2,5mm set stitch length. The wrinkles can be reduced, where you turn the screw a little orange. In addition, you can determine how many stitches should be made between the folds. (1, 6 or 12). The distance between the folds is of course on the set stitch length.
Conclusion: for me, the purchase was worth, I can do the part.


![Watchdogs - [Nintendo Wii U] (Video Game)](https://img.tgreer.com/thumb/85x85/5/3f/53f73a7acf79ff7b0e8e85b613635bfa.jpg)


