This Pop-up Sprinkler has below a 3/4 inch female thread, to the "normal" 3/4 inch connection elements can be connected (with external thread). Here you can buy Gardena components, but need not. (The Gardena connectors are but easy to install and therefore recommended). The laying pipe itself there at the hardware store much cheaper and just as good "not from Gardena".
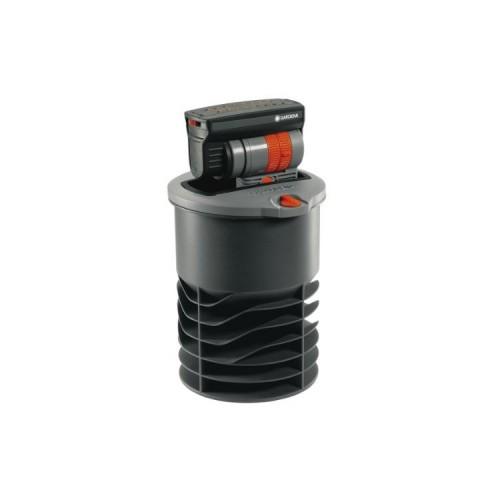
The Spinklersystem has a top cover which is fixed with two orange knobs. They can be made by hand and with little force to "open". After that, the cover can be removed. (The cover has a rectangular recess for the Spenklerkopf). The Sprenklerkopf sinks when not in use in the lid so that it is flush with its upper edge. On the cover is a rubber edge is mounted so that the Sprenklerkopf so pretty and rainproof closes dirt in the recess.
As mentioned above can be easily removed the lid. Underneath the cover is adjacent to the retracted Spenklerkopf a regulator with which limit the flow rate and also park quite leaves.
On Sprenklerkopf there are 4 possible settings. Each on the sides can be set on each side as far the sprinklers raining sideways. Through two rings sets you how far the Sprenklerkopf moves each also can be set individually for each direction.
The setting is simple and with in 50cm increments possible (with no wind).
The irrigated area in each case depends on the water pressure and thus of the number of connected Sprenklersysteme. That means you should perform the setting after you have adjusted the water supply for all sprinklers. Then you have to walk about 5 times the tap back and forth until the setting is optimal (pitching look, that issue - or you get wet - readjust, ...).
Once enough water pressure at sprinkler arrives pushes the Spenkler upwards (as shown in the picture) and starts slow and steady back and forth to pan. The area is doing reasonably evenly wet. Depending on the setting, there are quite "preferred" areas. It can cover a large radius by positioning the Spenklers above the ground (in operation).
In my previous system, I often had ants in the cavity of the sprinkler (Lead also for defect and replacement of a sprinkler). This sprinkler lid is fixed and as long as the seal ring around the sprinkler closes well, I expect an ant-free time.
Another note: Be sure to take the recommendation seriously a pressure valve (opens when the water pressure is low, in order to drain the water from the hose installed) at the lowest point to put the installation, possibly even more. Otherwise you have to dig for the next winter the verbuddelten hose again to repair the frost damage!
Also check well that the installation is really waterproof, before bringing soil on top. All Spenkler turn aufrehen water, Turn off the tap (without connections to separate), wait several hours and check that there is pressure on it. Only then einbuddeln everything.
Wind dependence:
The only drawback of the system is the wind dependence. Due to the large irrigated area of the sprinkler, the water must hurl many meters up (have not measured but there are already 5-7m). In strong winds, the water can end up (When neighbors, to their own windows, on the street, ...) everywhere. Several small "round Regner" have not the problem.
If one has in front of the system to fully automate so that it has to run even in the absence you here either tinkering (with wind measurement, there is not in my info from Gardena).
Conclusion: Very good suitable installation Regner, as long as they are not operated in high winds.
Greeting Mangars