
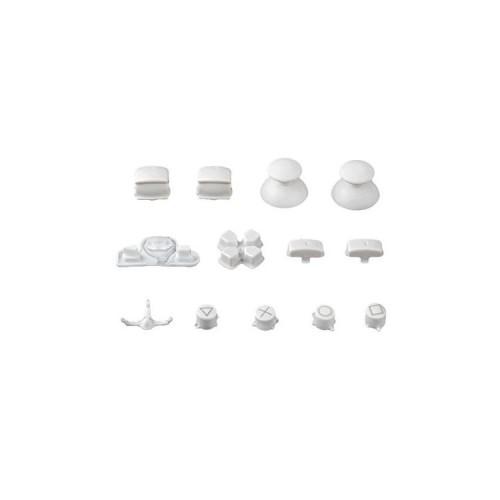
Goods suits similar to the original with minor degradation: it is necessary to partially remove plastic remnants from the production, so they do not interfere with the stroke of the button (X, square, triangle and circle). The latter, however, are not simply printed but made of two elements and feature a simple two-color (I like). The "1" - and "2" -Stanzung the L and R buttons are not as accurate (or "hot") like the original, but still okay. The "hemisphere" of the thumb sticks is a bit too small and thus dust and dirt from entering into the housing to the electronics and to the switches, which is not so nice. Similarly, the rubber coating of the thumb sticks is not as nice processed (but at least it exists). The PS button feels after the onset of the new rubber insert a bit spongy as the original, but does not interfere.
The change or installation of the elements is done quite simply, one only solves the 5 screws on the controller bottom and folds away the bottom element. Next, you work on the battery side and initiates the screw that holds the electronics. Then you have to solve with a small screwdriver or knife, so that you can lift out the electronics with velvet plastic cage of the upper casing, the small barbs of vibrating motors (4 white plastic elements). This presumably the L1 and R1 buttons fall out.
After inserting or changing of all elements is given to the electronics with the thumb sticks back first through the upper half of the housing (on the head lying) and fixes the electronics with the screw (making sure that the ribbon cable of all operating elements, which of in the middle plastic cage runs on the board, also has contact). Next, you have to push with a bit of flair, the L1 and R1 buttons back into the recess. Here, the question Plastic Cage part be raised slightly so that the pin of the keys is precisely on the pressure point of including fitting rubber element and the button can be pressed as usual. Now you have to use the L2 and R2 buttons. Here give it in mind that the small springs also serve their purpose. The plastic cage has a matching recess in which the trigger can be used on each side. Lastly, you have only the lower housing half-cautious about the L2 and R2 buttons "pull" and then pressing on the upper housing half so that they click together. Fix it with the 5 screws.
All in all, I recommend buying as the price is good and you can easily add value to its controller with other colors. The conversion is done in 5-10 minutes.


![LogiLink CR0007 External USB 2.0 Card Reader Stick for SD / MMC [PC] (Personal Computers)](https://img.tgreer.com/thumb/85x85/4/35/43536028c16a1375fa5d9199adaa08ca.jpg)


