
DELIVERY:
The set was delivered a day after the order. Each thermostat is individually wrapped, in addition there are three high-quality metal nuts and printed manuals at.
TOOL:
For mounting one benötig a midsize screwdriver, some kitchen paper and a pipe wrench. To avoid later operating noise, some lubricant with good penetrating (eg Caramba) is helpful.
ASSEMBLY metal nut:
I recommend to use the enclosed metal nut instead of the pre-assembled plastic nut. They not only looks better, but also takes better into the thread of the radiator. The change of the mother requires only a little courage with the screwdriver and is done in 30 seconds. For this simply press the flat part of the screwdriver deep between nut and threaded in order to be able to produce a lever. Then push apart the plastic nut with some force. Already they can strip upwards. Just put the metal nut, press firmly, ready.
MOUNTING THERMOSTAT:
Enclosed the attach / detach is explained by using a union nut, as it is nowadays well-used on most radiators. First, you turn the existing thermostat to the highest level. Then added the pipe wrench on the screw connection of the thermostat, and turn it counter-clockwise on. If the screw is loosened, the rest can most easily turn off manually. Does not that help further the pipe wrench.
If the old regulators removed, you should first remove any dust or old oil around the control pin of the radiator. To enable later-noise operation, we now sprayed some lubricant to the control pin and pushes it with the flat side of the pipe wrench several times all the way in. Now one sets the new controller in the desired position on the radiator and turns the nut so far that the threads just to grab starts. With one hand pressing the controller with full force against the radiator. With the other hand, using the pipe wrench to turn the nut clockwise firmly. It is normal if this is the regulator removed something from the radiator. Now everything Wipe clean and remove the protective film from the display. Done.
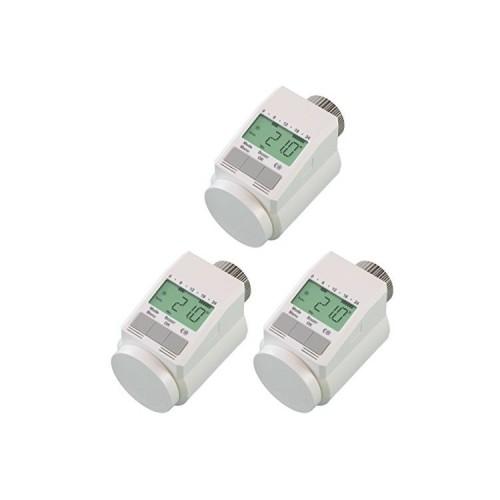
SETTING:
Before first use, you must first install the batteries into the battery compartment located at the bottom. Once this is done, the date will be queried on the display. The values can be set using the rotary control and confirm with OK. After the final OK, an automatic adjustment run. It measures how far and how strongly the rule pin can be pushed to their heating inside. The display will show "Ada" at.
The Comfort House has three operating modes. "Manu", where you set the desired temperature using the rotary control yourself manually. "Holiday" (suitcase symbol), here is that the set temperature is maintained until the specified date. And "car", here the temperature is controlled by fixed by them switching programs. In the modes "Manu" and "Auto", you can always adjust the temperature themselves on dial in "Auto" setting is valid until the next switching point. In addition, they can be fully heat the heater for 5 minutes on the "Boost" button. About the key with the sun and moon symbol, the temperature is simply placed on previously einprogrammierbare day or Nachtemperaturen - the same effect has the spin the wheel, only that it goes up faster.
To set "Auto" the desired temperatures and switching times for the mode, press for more than three seconds on the Menu button. It appears "PRO", which you confirm with OK. Now you can set up to seven switching times and associated temperatures desired for each weekday.
If the display shows "DAY", rotate the control dial to select the desired days and confirm again with OK. The first switching time is 00:00 clock, this can not be changed. Click OK to confirm. Then they set the desired temperature for the time, for example 16 degrees. Click OK to confirm. Now comes the next switching point, you can adjust using the jog dial. Select again the temperature to which the regulator should provide heat from that date. You can collect a total of seven switching times per day, six of them customizable.
The whole thing then repeat if necessary for other weekdays. I have for example a group MF programmed and a Sat-Sun.
More details can be found naturally in the beliegenden instructions. If they have but by working to herein, they know almost everything there.
TIPS:
- The batteries you should regularly change every 12 months. If the battery is almost empty (and one overlooks the icon on the display) is used for frost protection of the heating element is turned on maximum level. Annoying when that happens on vacation.
- By programming the switching times you should experiment a bit, after 1-2 weeks they have found the ideal setting. It is worth it.
- Temperatures are always controlled from the switching timing. Example, if you like it in the morning at 6:00 clock in the bathroom have warm, you may need to adjust the time forward to 5:00, because the heating process takes a little yes.
- If the Comfort House in the bedroom or children's room, put the switching times are in the stages of sleep. Although the engine is not loud, but quite audible. Who is sensitive can wake them.
SUPPLEMENTS:
16/01/2015 - All installed controllers are still working without problems. I have now for the last two Heizkörperregler ordered (double pack) and found that now the metal nut is installed. A plastic nut no longer exists. The metal nut is redesigned - and unfortunately very sensitive to scratches. When mounting with the pipe wrench should be approached cautiously, possibly taping them.


![TuneUp Utilities 2014-1 Square [Download] (Software Download)](https://img.tgreer.com/thumb/85x85/0/32/03267b900b3886de4facc141bde9da2a.jpg)


