However, it is necessary to schedule a little time to build up and to read the manual carefully and observe them.
I needed a good 3.5 hours, and would imagine myself to be not fully blessed with two left hands.
Importantly: The instructions carefully observed, then it works already. The manual itself seems at first a little daunting because of the scope, but it is really well designed and leaves a few questions. Minor shortcomings can get over, for example, is really well recognized in the parts list, not every part and I've been looking for 10 minutes after the locking devices for Drawer Magnets. The figure was plentiful small and difficult to see, even the embossed item number I could not find. The solution: the part is about 3 x 2 mm in size and has accordingly no place to take a number.
What I did not know in advance: the door is not only for 100 cm wide balcony doors. The linkage has to be sawn from the buyer to the extent necessary. So you need a hacksaw, an optional Flex. In addition, of course, a screwdriver, a file for deburring is not wrong.
I have made myself diligently to work and sawn, but then held on the door in front of the assembly of the frame times for safety's sake the items. Did not fit. Before I could but really annoy me I noticed a paragraph on the very first page of the installation instructions in the eye, was in the: if you're not around 3,5 cm bearing surface on the door frame, etc. eg roller shutter guides, then you have the adjust accordingly extent. Had I read that would previously have helped me from the beginning. Own fault, so I had to once again saw the cross members.
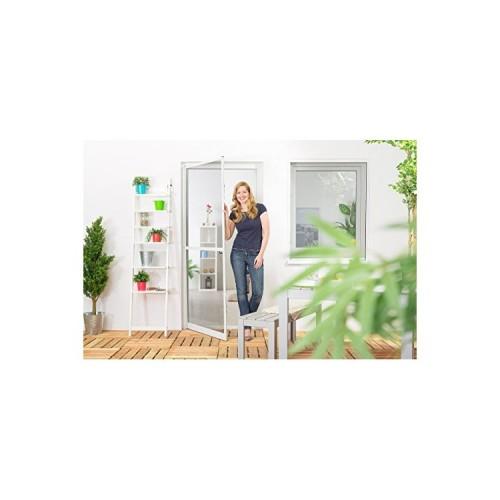
The result can really be seen, I am thrilled difficult. The two magnets are strong enough to hold the door tightly. My 15 month-old daughter but do not get so easily opened the door to her chagrin, has advocated but 10 minutes scheckig laughed as the door with a clearly audible "plop" Castle.
Included is a spring, which can be mounted either on the middle hinge and the door closes automatically. Maybe I could here the width of the door to still have to cut a further centimeter to accommodate this spring tidy can. The spring pushes the door already clearly with force. But that's what it was so that the door against the pests from outside is finally reasonable closely.
Only in the lower cross strut agreed the description is not entirely with the actual state agreement, it lacked a groove and I could not attach grille and sealing strips. But I can get over benevolently.
After successfully building I was really proud of the final product can be more than excellent. However, caution is to be truly exercised in roller shutter rails. Before building I tested, is much space between the frame and roller shutter. Should have fit, albeit with little play. What I had not paid attention was that the inner handles the door and the outer handle of the balcony door are exactly on the same level. If the balcony door is thus closed to open automatically the door to a half to one centimeter -> blinds can not be let down. The you can remedy by first opening the balcony door, then the roller shutter lowers, then the door closes again. At least in theory. In practice, I could not test, because although apparently enough space between the top of the door and the blinds seems to be the elements of the darkening bruises so much about the screen door that he as is virtually "no longer be closed" to be classified. In other houses like it fit better, in our case, I have to tinker a bit, to me a solution is sunken.
Nevertheless, I have to say that the product works exactly as it should, the blueprint is first class, the building time consuming but manageable and there are even one of the two required metal drill, a fitting bit attachment and in my case, even the delivery note enclosed the cutter needed included.
Required are:
- Cordless Screwdriver
- Drill bit (2 mm)
- Hacksaw
- Small screwdriver
- Spatial awareness
- Hammer
- Tape
- (Spirit level)
- About 3 hours time