
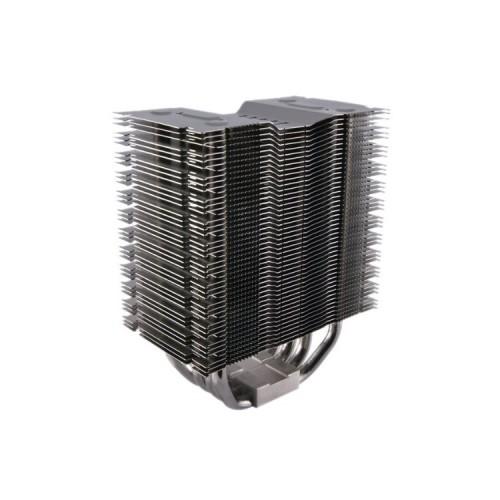
In the instructions of the fan itself, there are indeed very terse Design instructions for 4 different base, but not for AM3 and at least for my board was working no the depicted. So I had to get creative to find a structure in which fits the fan as a former casemodders.
For those who want to imitate the: you should for constructing get you additionally 8-16 small plastic washers (depending on thickness and certainly motherboard slightly different), which are very important! Otherwise, the supplied material already sufficient.
If you do not want lose 1-2 RAM banks (like me, because all of them are occupied 4) is later not show the fan up or down, but to the left (rear panel).
What to do now so: (I try to describe the parts as figuratively, so that everyone recognizes the right parts)
1. Remove the motherboard from the Gehäude, otherwise that is before anything, and then place the 4 "rubber nuts" under the motherboard for the socket holes.
2. Take the metal plate with the 3 per tips, which can be seen also in the instructions for AM2 +. sets this to the black insulated face down on your base. The outer holes in 3 tips should now fit on the motherboard socket holes. As you can see, the distance is very flat and no matter how you hold this metal plate, the thick brass pieces (with the threaded inside) be to bring never so between board and board, so that the radiator also reaches the CPU. So let this aside and looked at how many of the plastic washers, which I mentioned at the beginning, you need the distance. Do not take this so many that the distance is completely filled and the metal plate is pushed up, but most so many that half a millimeter remains air that runs properly then ran and later by sitting properly fixed.
3. Now take of the two metal plates, which is placed between the CPU heatsink and the fins, the version that is not rounded but wide and square. Makes this once in the radiator in and sets the cooler now so the CPU on, with the long edge going from top to bottom and the fans so sitting later left or right. The outer holes of the two metal plates used should now fit exactly on each other with a little distance.
4. If you use the same motherboard as I or similar, so it should now be clear that the heat sink so clean on the CPU rests, all RAM slots are still available and match the holes in the metal plates. You have to fix the structure, whereby the easy part ends and the fiddly job begins so only. Sets you most willing a long thin tweezers.
5. Seek out out the 4 long screws that fit into the brass body. In addition, even the 4 shorter screws, which then fit into the rubber coated nuts.
6. Places the mainboard best so (z. B. similar to cardboard) that the area under the base is once free and premeditated nor all previous parts aside.
7 then puts the corresponding number of plastic washers on the socket holes of the mainboard. Now put the long screws from below through the first metal plate, so that they stand out upwards and then places the plate on the base. Now the 4 short screws must be inserted from above through the metal plate and washers, so that they can fix it with the rubber nuts beneath the motherboard. Pulls out all the screws well and will seek to ensure that the long screws do not fall out or about to cross questions and tilt. If available, you can take a small piece of electrical tape and secure the long screws so as it can later easily removable. If the washers slide, pushes gently with the tweezers again to the right place. That was the fiddly part, the rest is easy, but still requires tact!
8. Test best again if everything is in place or is sitting and now carries the thermal grease as usual on the CPU on (not too thick and beautiful equally distributed). It takes about 50-60% of the available quantity.
9. Sets now carefully on the cooler with the second metal plate so that it is no longer large slip on the CPU with the thermal grease. Put the long screws one after the other through the holes of the second metal plate and rotate it easily into the brass pieces that you have not between the metal plates, but on top of the second metal plate. Once all the screws once have such maintenance, you can it in a circle or cross piece by piece pull tighter. It extends the screw from the bottom with a finger hold / press and rotate the brass piece. After a few turns, the construction will be already fixed and you turn maximum until nothing slipped or they easily begin to bend toward the lower the upper metal plate. Here you need the sensitivity.
10. What is practically out of it emerges from not at all the normal instructions, the construction of the fan. If your RAM banks are to the right of the CPU, then take a look at the arrows on the fan edge and see that the already mounted rubber feet on the fan on the wrong side. Removes this so and puts them on the right side of this construction, so that they are between fans and coolers, if it is to carry out the air to the left out of the housing. With 2 of 4 long metal bracket, the fan can be easily hooked to the left then. On the right side fits at least in the case of my Boardes no matter how narrow 120mm fans on it, because the Corsair Dominator with passive cooling for this is too high. Who wants and has can also place it on the right side of a 80 or 92er silent fan. As I still had a 15-18dB fan with 92mm in the closet, I have the other two strap bent into shape a bit and thus the 92er fans (also incl. The 4 remaining rubber feet) then constructed on the right side.
Installation is in my Thermaltake Armor (1st version).
Since there in Gehäude also one more 120mm fans deducts left the warm air from the enclosure, so you have a very good air circulation. From the right of the 120 pulls on the HDD cage, the air clean, which flows around the two mirrored system disks, then through the RAM banks to the CPU and then goes out from the computer. The graphics card thus remains quite unaffected and above the power supply is also available again outlets carrying Warm risen air outside.
Conclusion:
After 2 hours tinkering from concept to finished find implementation, the installation was worth. I now often feel (compared to the old boxed fan of Black Edition), that the computer is still not at all, since you practically no longer hear him. Apart from DVD drives I'd say the graphics card fan the Sapphire HD5770 Vapor-X is now the loudest.
In operation after 3-4 days I have 40-42 ° C CPU temperature, while the graphics card is including constant in Windows to 52 ° C. Once I start a game (so far tested with Shift2, TDU2, Civ5, Sacred 2 incl. Network server), the CPU temperature at 47 ° C high and then stagnated at 52-53 ° C (3 hours continuous operation is always constant at this level). Simultaneously, the graphics card was in the time high on 72-73 ° C and stayed there also constant.
So overall good result and nice quiet fan. Only a few parts more for the simple construction on AM3 socket motherboards and VII. 1-2 steps more in the manual would be desirable. Therefore, 5 stars for the fan itself and a star deduction together for instruction and AM3 tinkering (the latter is not advertised, but theoretically supported and could be improved).


![Destiny - Standard Edition - [PlayStation 4] (Video Game)](https://img.tgreer.com/thumb/85x85/f/a1/fa15173f9f8ff36e.jpg)


