
After the purchase I was able to fill in an email and then began the wait. A few days later reported to phone a young woman of the shipping company with regard to delivery date.
The next day the truck was at the door. Shipping was on a Euro pallet. Since I do as an individual no pallets for exchange, thus it was called down from the pallet. Crazy how clean everything puzzled together nicely on the pallet was. Please get no shock; one sees only wood and no other additional accessories. This is located inside the tower puzzle. The range should be as we did it give to directly back Euro pallets as I said a pledged property are. The truck driver is also usually happy if he does not have to come again and help rather short unloading. Of course, not every truck drivers alike. However, ours was very nice.
The wood comes as many complain about wet and greenish on. That is wanted !!! The wood is impregnated As already explained; ie it is me high pressure impregnation pressed into the wood in order to better protect it from environmental influences. It is a normal process that the wood is green then and partly as has mold spores !!! It has no negative effects in all respects! The wood can still be painted with wood protection glaze!
Reading the manual was a disaster and I can and love to build my instructions, or to tinker. However, this is not recommended.
I took the manual and the tape measure and began first to set several stack to the garden and assorted wood.
Then I sat down first (which is highly recommended) with a cup of coffee and several cigarettes and looked stubborn in the plan. Please take your time !!!! Time and rest is the Alpha and Omega! You will never build the tower as a layman in one day! It took 1 1/2 days and a lot of time is needed only for studying the plan. The plan has also so what a mistake as far as the floor covering up in skid height dimensions of the boards! This led me later fully from the concept. Here help eerie color images from different perspectives from the Internet.
I like to tinker and have my peace at the wedding except for the towers and the swing all by myself (but more on that later). It takes some time a second person.
I am now proceeds as follows:
1) Tools required set which would Screwdrivers, Bits Sets with Torxeinsätzen, wood drill in different strengths (always nice pre-drill), ruler / tape measure, pencil, Allen wrench, grinder, water balance, and a ratchet with 13, 17 and 19 mm nuts (faster as with wrenches). Perhaps a director.
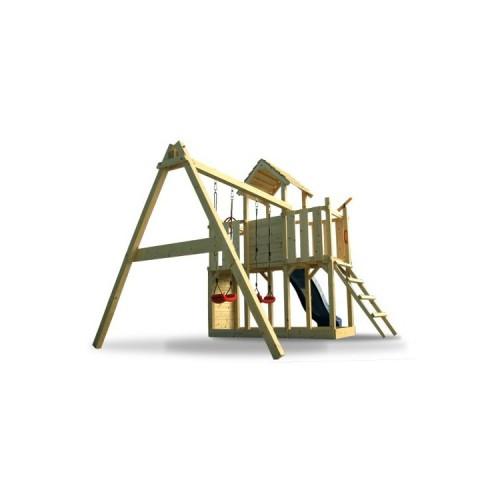
2) Insert the 1 long bar and a short bar on the ground and begin to build in the pursuit. The process is repeated 4 times. Now you have successfully set up the two outer towers. Make this the best equal to the selected place and align them the same accordingly. Please also take into account the same direction in which the swing and the direction in which the slide should extend. The Carillon Tower should be on the lawn and within 2 meters should be no danger zones as lawn edging stones, trees, fence posts, tomato skewers, etc. Reduce the risk of accidents as much as possible !!!
3) After the two towers stand, to celebrate the wedding of the towers. Here I needed one more person who persevere the whole thing fixed. The main frame is.
4) Place the two rocking beams on the floor and connect them. Do not forget to drill the holes for the swing hooks in the main bar.
5) Now we move the "floor" on the towers and reach the final stiffening! Do not forget to pre-drill, otherwise splintering the boards or crack. No pre-drilling is as if one drives a riving knife into the wood and splits it. The Torx screws can be completely sunk after drilling. The sinking also decreases the risk of injury. In the same step, I mounted the climbing wall.
6) hiefen the main swing bar on the jungle gym and let point 4 hold by one person. The whole now align and screw.
7) Screw together the roof and also screw equal.
Now you climbing tower should be as far as possible. The sandbox I have not mounted. I will prepare something in the winter in the basement. I want to install on the ground floor instead of a sandbox game store with a sitting area and disguise the whole thing as the climbing wall with wood. Speak with door and window. With a little idea can expand the tower wonderful.
Please ignore the chatter of people who have no idea: The wood is wet from the impregnation process and and green and is normal! Likewise, all this is what you need to build the tower safely! It will not require any additional materials, other than those as already described by the seller floor hooks and so we come to the main topic already build.
Ground anchor there are many and this. In a variety of forms and applications There are those for screwing, concreting or take.
That is why here the pros and cons of various anchors:
; Qid = 1347319874 & sr = 8-1
The anchor described here is available in lengths from about 40 to about 60 cm length. I am in no way pleased with these anchors, since they are only screwed and can not ensure proper reinforcement depending on the hardness of the soil and 4- 5 great kids bring the tower quickly falter.
ülse-ground anchor Ø 121mm / dp / B0042NSELI / ref = sr_1_10? ie = UTF8 & qid = 1347319874 & sr = 8-10
Of these I have four sleeves for the inner support post (where the roof is mounted) smashed. Advantage is now that the wood has no more contact with the ground and thus a continuous moisture is prevented. An impregnation is ineffective when the wood is permanently on damp grass. The wood rots just as quickly. The sleeves have water drains and the bar have no more contact with the ground. Disadvantage of these sleeves: they can not be mounted endfest. The longer they are indeed taken in the soil the more firmly they are nevertheless inappropriate.
äger corrugated steel concrete anchor-galvanized / dp / B008HBYO7Y / ref = sr_1_1? ie = UTF8 & qid = 1347321029 & sr = 8-1
The einzigst akzeptabele opportunity for me both swing beam and the four outer beams permanently and really stuck to assemble! In addition, I have taken a quick-setting concrete which is slightly more expensive but for the kids ensures the first frolicking on the following day and be sure that you are prompted before breakfast if you go with the swings.
[...]
This concrete will begin to harden after 5 minutes and then overnight extent cured the first test nothing stands in the way.
; Qid = 1347322135 & sr = 8-4
as such I have taken for the slide. Keeps Bombenfest!
I bought all fasteners at Bauhaus and there bought the concrete. I have processed 20 bags of 25 Kg.
The steering wheel and the telescope can be installed variably.
In addition, I have bought a flagpole, a funny Pirate Flag and pipe clamps, which gives the game device the finishing touches:
ülse / dp / B003KGPWSG / ref = sr_1_1? ie = UTF8 & qid = 1347323588 & sr = 8-1
är / dp / B003BFWS10 / ref = sr_1_86? ie = UTF8 & qid = 1347323669 & sr = 8-86
'/ Dp / B006KDE1FG / ref = sr_1_3? Ie = UTF8 & qid = 1347323722 & sr = 8-3
A small mango, I have however still: Between climbing tower and climbing a little 5 centimeters long continuous gap is able to slip with his feet in the children. I need not mention what would happen if a child would reinrutschen with your foot and then falls to the outside. In addition, the ladder rungs are far apart. In young children, additional sprouts should be screwed. We're talking about 3 boards for any 10.- Euro.
I hope I have not forgotten anything and hope you enjoy building !!!
I hope my pictures you like and help build!
Unfortunately I can not respond to comments, but I will be happy to answer questions and record the answer here.


![Disney Infinity 2.0: Marvel Super Heroes - Collector's Edition - [PlayStation 4] (Video Game)](https://img.tgreer.com/thumb/85x85/0/7d/07d4b1706fae1000.jpg)


