
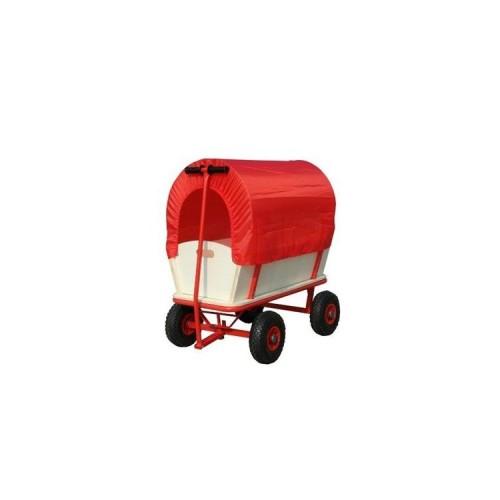
The result: scrap, which you can not even assemble! But wait - as fast as I do not give up. First there was the problem with the missing Vorderachsgestänge solve. Since we need the carts in a week for the beach was out of a lengthy exchange Amazon. Starting in the shop around the corner, there bought a wagon for 10 more found that it is the same scrap (all rusty, same quality). Keep linkage, rest exchanged. OK - this is not the fine English way, but after I saw exactly the same car at Obi and our local hardware store for 79 or 89, I knew that here rip off is operated !!! All parts, yellow plastic nuts and co are identical.
Now it came to assembling and pimping. But before that accessories buy at the hardware store:
>> 8x Machine screws (round head) - 6x40mm
>> 8x matching washers and nuts
>> 50cm aluminum pole 20mm outer diameter
>> Small tin paint acrylic Buntlack
>> 1 screw M10 with 2 washers and matching (self-locking) nut
>> 32 small wood screws with countersunk head 3x20mm
Costs for accessories: 20
First, the small screws 32 (four each) screws into the groin, where the front and rear wall is inserted. These strips are stapled and when it should not be inspired to last! Who uses the extra seat, should tighten their mounting lot again.
Now, the 8 screws of the side walls dissolve, drill with a 6 bit, drill the holes in the iron wall supports. The yellow plastic nipple easy rausdrücken and throw them away! The built rusty screws have in the plastic nipples anyway not stop and turn immediately to the tightening.
Now everything is disassembled and prepared for painting. I have a strong blue and green used. Color can be diluted with water usually still. Dear underline 2 times thin, than once too thick! The wood absorbs the paint on the wood dry for about 15 minutes.
Important: Delete the impacts of all wood panels really tired because the Mehrschichtleimholz else here swells when the carts in the rain! Rotznasen at avoiding strike! :-)
The push buttons for the tarp I painted over with, because I'm not going to use it. Junior is 4 years and with tarpaulin and bench seat, the whole car in the height a bit too small! Especially as the tires and the tarp smell quite strongly of chemicals. The smell reminds me of the tire warehouse at ATU
If all is well dried, put the machine screws from the inside out through the wood and the wall supports, secure with washer and top nut.
Continuing with the pole and the handle bar. The rod I ca 25cm sawed by the handle, and pushed the entgradet 50cm long aluminum pole and so conveys the good 15cm is now longer the handle bar. I am 1,92m tall, but even people with 1.8m height must draw bent the car, or the front wheels hanging when pulling in the air. The inserted aluminum pole I have also previously coated still with contact adhesive and then pushed into the sawed handlebar. The whole thing again just aligned and fixed with a 5 Series screw at each end (obviously previously drilled hole 5 Series).
Fasten the screw to the drawbar is too small in cross-section, thus the rod wiggles back and forth.
Use throw away and thicker bolt with 2 washers on the left and right: solution. The purchased M10 screw fits through the drawbar, but eventually the two holes of the pole with 10 drills have to be drilled slightly.
Reassemble the end all. To decorate a few stickers (Wall Decals) and you're done a horny, durable and individual carts! All this work can be done alone. Time for disassembly, drilling, painting and assembling about 2-3 hours (without drying time of the paint).
Conclusion:
I admit the carriage 3 stars because he arrived quite ragged and even incomplete and dirty. But I doubt that it's different in a 60-100 expensive car. The material is OK, but the untreated wood swells and can splinter quickly. To me it was worth the work and after an afternoon and a few extra euros you for a real gem! Images come.
Ciao - Steffen


![The Elder Scrolls Online Imperial Edition - [PC] (computer game)](https://img.tgreer.com/thumb/85x85/a/cd/acd051cfddf08be9.jpg)
![The Elder Scrolls Online - [PC / Mac] (computer game)](https://img.tgreer.com/thumb/85x85/b/e9/be9702468be31a67.jpg)
![The Elder Scrolls Online Tamriel Unlimited Imperial Edition [PC / Mac Online Code] (Software Download)](https://img.tgreer.com/thumb/85x85/9/55/955209e15b26fad3.jpg)


![Defiance - [Xbox 360] (Video Game)](https://img.tgreer.com/thumb/85x85/2/54/254eadcd0e640db6.jpg)


![Kinect Star Wars (Kinect required) - [Xbox 360] (Video Game)](https://img.tgreer.com/thumb/85x85/5/38/538bf0cb00a1a5f3.jpg)


